Exploding coffee makers—especially when they’re pressurized—tend to be day-ruiners. Yeah, cleaning isn’t that fun, but trust me…. it’s necessary, especially when it comes to moka pots. Safety and cleaning are actually interconnected with this brewer.
I can’t say for sure what he did to make his brewer explode like that, but I do have a couple guesses—and most of them have to do with cleaning.
In this quick guide, I’ll show you how you can keep your moka pot in tip-top shape and how to stay safe so you never have to worry about a surprise kitchen explosion. Don’t worry—it’s all actually pretty simple.
Why Moka Pots (Rarely) Explode
Moka pots don’t just immerse coffee grounds in water. They create a ton of pressure that generates steam—and this pressure can be troublesome if your brewer’s not in good shape.
Just like with anything that’s pressurized, a dramatic change in pressure can cause some wild reactions with the device. Sometimes the pressure is just too much for the container, so it explodes open violently once it can’t handle it anymore.
Read: 7 Common Moka Pot Questions Answered
Now, moka pots do have a safety valve that’s designed to keep too much pressure from building up in the device. Once more pressure than is necessary is generated, it starts to shoot out of the valve in the form of steam.
99% of the time this works exactly like it should. But that other 1%? Well, that’s when you hear a big bang and end up with coffee on the ceiling.
There are a few reasons the safety valve can malfunction:
- The valve is clogged with coffee grounds. If grounds happen to fall into the valve, they’re probably going to get stuck there. Over time, this can cause blockage in the valve and compromise its safety.
- The valve is clogged with water gunk. If your local water source is ‘hard’ (has a high level of calcium and magnesium), you’re bound to see white gunk build up inside your moka pot over time. This gunk can be pretty stubborn and can clog the safety valve.
- You tamped the grounds. Moka pots, unlike espresso machines, do not require you to tamp the grounds to get a balanced extraction. Tamping the grounds down into the filter basket can cause excess pressure to be generated. Just don’t tamp—you don’t need to.
- You covered the safety valve with water. Over-adding water can cover the safety valve, which keeps it from being able to let out steam. Always leave a small amount of space between the water level and the safety valve.

Read: The Ultimate Guide to Brewing Moka Pot Coffee
As you can see, half of these issues have to do with a dirty safety valve. I told you safety and cleanliness are connected with moka pots!
Let’s get into how you can keep your moka pot clean and explosion-risk-free.
How To Clean Your Moka Pot
Thankfully, cleaning your moka pot is a very simple process. It only takes a few minutes of your time, but it keeps your moka pot from destroying your kitchen—or worse—destroying your coffee’s flavor.
Over time, coffee oils and micro-grounds build up all over the insides of the moka pot. These are harmless when it comes to your health (unless those grounds are in the safety valve), but they do impact your brew’s flavor. Those old oils can go rancid and the grounds continually impart bitter flavors into later brews.
So, even if you like random explosions, you should still clean your moka pot if you don’t want your coffee flavor to go downhill over time.
Read: 3 Reasons To Avoid French Roast Coffee
Rinse And Dry After Every Brew
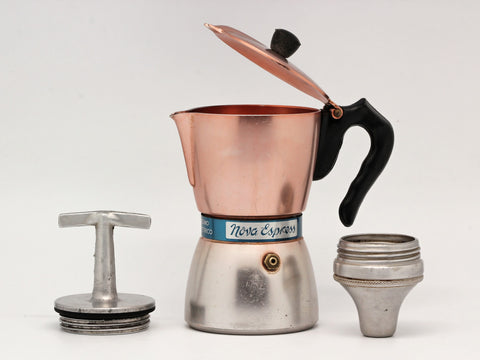
Once your moka pot cools, disassemble it and remove the filter basket. Toss the spent grounds into the garbage and thoroughly rinse and dry the filter basket. Now give the other pieces a good rinse and dry too. You can use a paper towel to wipe away and stubborn grounds from the basket or seal.
Especially if you have an aluminum moka pot, you want to make sure everything’s very dry before putting it all back together.
Don’t put the moka pot in the dishwasher. Don’t scrub the moka pot with an abrasive material. There’s a coating on aluminum moka pots that keeps your coffee from taking on a metallic taste, and you don’t want to accidentally scrub that off.
This basic process is really the key to a clean moka pot, but may not be enough if your water source is pretty hard. If it is, you’re going to want to give your moka pot a deeper clean twice a year or so if you use it regularly.
Read: The Ultimate Guide To Buying Specialty Coffee Beans
Descaling Your Moka Pot
All coffee makers need descaling eventually. Even soft water has a small amount of minerals—and they’re bound to build up and cause blockages eventually.
Here’s what we’re going to use:
- 1 Tablespoon Vinegar
- 1 Tablespoon Lemon Juice
These two acids are strong enough to break down hardened calcium deposits but are generally considered safe for use with moka pots, both stainless steel and aluminum models. You can also use a dedicated coffee machine descaler, but chances are you already have these two acids available.
Read: Moka Pot VS Espresso Machine: Which Should You Buy?
Let’s see how it works:
- Add lots of water. Fill the lower chamber, cover the safety valve, and keep adding until the water line hits the coffee filter basket (that way the oils can be cleaned from there at the same time).
- Add the acids. Mix the lemon juice and vinegar into the water.
- Let it all sit. Give the acids 2-4 hours to break down the calcium and oils.
- Pour out some of the water. Make sure the safety valve is no longer covered—you’re about to do a plain water brew cycle and want the valve to work if needed.
- Run a brew cycle with the acidic water. Turn up the heat and pretend you’re making coffee like normal. The acidic water should rise up the brewer into the upper chamber. Once that’s complete, turn off the brewer.
- Another rinse and wipe. Give everything a good rinse and wipe with a clean rag once the moka pot has cooled down. Once dry, reassemble.
While the process takes a few hours overall, there’s really only 5-10 minutes of hands-on cleaning—and it goes a long way. Now your brew will be untainted by old grounds, your moka pot won’t have a faulty valve, and you can brew will complete confidence.
---
Though cleaning is a rather annoying part of the coffee experience, it’s not one I suggest skipping. Everyone at JavaPresse agrees: a clean brewer just makes better coffee.
Of course, cleaning’s just a small part of making sure your daily mug of coffee is rich, delicious, and super satisfying. The most important part? The coffee beans.